How to Reprocess A TEE Ultrasound Probe
The art of disinfecting transesophagael (TEE) ultrasound probes is very different and challenging when compared to other endocavity probes, i.e. a colonoscope or gastroscope. The industry, for years, has categorized TEE probes as an endoscope. The similarities of TEE probes to endoscopes are minor. Take the colonoscope and gastroscope, they are similar in length to the TEE probe but that is the only similarity. To properly reprocess a TEE ultrasound probe the technician should be aware of the delicate nature of the various components. A critical difference between the colonoscope and gastroscope is that the TEE probe can’t be completely submerged into the rinse and high-level disinfectant bathes. The TEE ultrasound probe is not water tight and the complete submersion of the probe could cause serious damage and result in the probes inoperability. A thorough understanding of the TEE ultrasound probe, of how it can and should be reprocessed, is critical. This knowledge will lead to minimized TEE ultrasound probe damage, improved patient outcome and allow for proper reprocessing that will minimize HAIs.
The Challenge
TEE ultrasound probes consist of four main parts, as described by probe manufacturers and as illustrated in Figure 1. Part one consists of the electrical connector and strain relief. This portion connects the ultrasound machine to the TEE ultrasound probe. The cable of the TEE ultrasound probe connects the handle and steering mechanism. This portion of the TEE probe is not water tight and should not be submersed in liquid. Section 4, as illustrated in Figure 1, is the long insertion tube that has the transducer at the tip. This section of the TEE probe can be difficult to handle during pre-cleaning, cleaning, high-level disinfection, drying and subsequent storage and transportation. The overall length, from points one to four, of the TEE ultrasound probe and the fragile nature of the transducer make handling of the device susceptible to damage and challenging for healthcare professional. Care to minimize excessive handling and contact shock to the distal tip should be taken when manipulating the components during all facets of reprocessing.
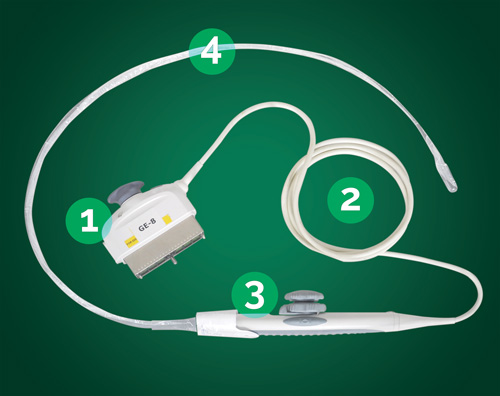
Fig. 1: Probe Breakout
- Electrical Connector
- Cable
- Handle
- Insertion Shaft
Step #1 - Point of Use Cleaning
Bedside cleaning, also known as pre-cleaning or point of use cleaning, must be done for the successful reprocessing cycle of a soiled TEE ultrasound probe. When the probe is removed from the patient it should be wiped with an enzymatic product, like the TEEZyme® Enzymatic Sponge, to remove organic and inorganic soil so as to prevent these materials from drying on the probe.
Step #2 - TEE Probe Transportation
Transportation of the potentially biologically soiled TEE probe should be handled with a device or method that minimizes the potential for probe damage as well as occupational exposure to fellow staff and other patients. TPorter® is a solution designed by CS Medical to provide standardized care and handling of the TEE ultrasound probe during this critical portion of the reprocessing cycle. TPorter TEE Ultrasound Probe Transportation and Procedure Case are designed to deliver the enzymatically treated soiled TEE probe from the procedure room to the designated area for reprocessing.
Step #3 - Cleaning
-
A manual soak cleaning step should be done prior to high-level disinfection of the TEE probe. The probe should be rinsed to remove the bedside cleaning solution with a large volume of tempered water. The general recommendation is for a one minute contact time per eight liters of water.
-
The rinse water then must be drained or removed from the basin or sink.
-
The basin or sink is again filled with the tempered water along with enzymatic solution, like TEEZyme®MC, for an enzymatic bath. Follow the enzymatic solution manufacturer’s recommendation to create the correct concentration for the enzymatic bath. Commonly, one "pump" from a gallon sized enzymatic solution should be mixed with one gallon of water.
-
The TEE probe shaft is submerged into this enzymatic bath. The handle and connection cable should never be placed in the soak basin or sink to avoid damage to the probe.
-
The probe shaft should soak for the enzymatic solution manufacturer’s directed time found in the instructions for use.
-
After the enzymatic bath is complete, the basin or sink should be emptied and fresh tempered water should be used to rinse the TEE probe. This rinse should also use a large volume of tempered water. Follow the enzymatic solution manufacturer’s recommendation for time and number of rinse cycles.
Step #4 - Probe Drying
Drying of the TEE Ultrasound Probe, with a product like the QwikDry® ultrasound drying cloth, is recommended before placing the probe into the high-level disinfectant solution. This can eliminate excess moisture that could interfere with subsequent microbicidal processes. Debris and gel can act as a barrier; while water can dilute the disinfectant which can mitigate the disinfection process. With reusable disinfectants this can become problematic. The healthcare professional must be vigilant in conducting a Minimum Required Concentration (MRC) test prior to each and every high-level disinfection process.
Step #5 - Electrical Leak Testing
Almost all manufacturers' operator's manuals say that electrical leakage testing should be done before every patient exam. If your healthcare facility is an IAC accredited institution you are required by the standard of care to conduct an electrical leakage test on all TEE probes prior to high-level disinfection. The IAC standard states:
"The manufacturer's guidelines must be followed for the appropriate care and cleansing of the TEE transducer and adhere to the appropriate infectious disease standards to prevent the transmission of disease. Effective December 31, 2015, the structural and electrical integrity of the transducer must be checked between each use, using an ultrasound transducer leakage tester, "Passed" or "Failed" must be documented in the routine TEE probe cleaning/maintenance log along with action taken if failed".
The CS Medical HLD TRACKER™ offers healthcare professionals the ability to record this information as well as cleaning and high-level disinfection data in one central location for future review and audit compliance.
Conducting electrical leakage testing can be accomplished with CS Medical’s ULT-PC-31 electrical conductive probe within the TD 100® prior to high-level disinfection. CS Medical offers the BC Group ULT-2020 ultrasound leakage tester and respective adapters that are specific to each TEE probe. Conducting the electrical leakage test, with the TD 100, is simple and requires less set up and supplies to complete when compared to other solutions.
Step #6 - High-Level Disinfection
Automated: To complete the high-level disinfection of a bedside cleaned, manually cleaned, rinsed and properly dried TEE Ultrasound Probe can be accomplished with the TD 100® Automated TEE Probe Disinfector. The TD 100 is designed to automatically high-level disinfect a transesophageal (TEE) echocardiogram ultrasound probe and thoroughly rinse disinfectant residue in less than 17 minutes. The TEE probe is placed into the disinfection reservoir of the TD 100 and simple and direct prompts allow the end user to set up and initiate the TD 100 to HLD and rinse the TEE probe. TD-5 and TD-8 are single use, FDA cleared high-level disinfectants that does not require individual MRC testing prior to use like other reusable solutions. At the conclusion, a printed receipt is furnished that documents the contact time, contact temperature of the disinfectant, probe serial number, operator ID, disinfection lot number and run number of the disinfection cycle. The receipt then can be placed into the HLD TRACKER for later reference or audit.
Manual: Fill a high-level disinfectant basin with an approved chemical per the probe manufacturer’s guidelines and ensure proper ventilation as per the SDS that accompanies the chemical. Place the TEE ultrasound probe into the solution. Caution, when placing the probe into the solution should be maintained to prevent the handle and steering mechanism from being submersed thus resulting in liquid intrusion. This will result in probe damage and ultimately device inoperability. Only place the long insertion tube into the high-level disinfectant basin.
It is extremely important to review the high-level disinfectant instruction for use to determine soak time and contact temperature. Different disinfectants have different indications for use relative to the contact temperature. For example, an aldehyde based disinfectant might perform high-level disinfection in 45 minutes at 20 or 25 degrees C while at elevated temperatures the disinfection time might be as little as 5-12 minutes. Critical to the process is understanding the chemistry used and to make sure you follow the indications for use exactly. One of the weak points in manual reprocessing is the variations between high-level disinfectants and the ability to confidently ensure correct temperature of the disinfectant throughout the required contact time.
Precautions should be taken as occupational exposure to the high-level disinfectant is a concern, when manually reprocessing a TEE ultrasound probe.
Step #7 - Rinsing after High-Level Disinfection
Depending on the high-level disinfectant being used the soak time will vary (if you are using an automated reprocessor, then no manual rinse is required). At the conclusion of the high-level disinfect soak time remove the TEE ultrasound probe and place ONLY the same portion of the probe into a tempered clean water solution. This is done to allow the disinfectant residue to be removed. This process should be repeated three separate times with a large volume of fresh potable water as outlined by TJC (The Joint Commission). Once the probe is removed from the fresh water basins, drying of the probe, between rinses, is an added step that will help to minimize recontamination.
Per the CDC, "The optimal rinse fluid for this device would be sterile water; however, sterile water is expensive and difficult to produce in sufficient quantities. If sterile water is not feasible, water that has been passed through filters with a minimum pore size of between 0.1 – 0.2 microns would be essential as a rinse fluid for this device."
CS Medical, through our partnership with Nephros Inc., can provide point of use water filtration, that meets this recommendation, or provide an inline water filter to provide the TD 100 with filtered water.
Step #8 - Probe Drying
Drying of the TEE Ultrasound Probe, with a product like the QwikDry® Ultrasound Drying Cloth, is critical before storage or transport. Wetted surfaces are prone to attracting airborne contaminates resulting in probe contamination and potential HAIs being passed from the environment to the next TEE patient. By drying the probe before storage, either in a clean sleeve or probe storage cabinet, the potential for bacterial growth is removed from forming on the TEE ultrasound probe. Warm, wet surfaces foster bacterial growth and depending on the storage method, a wet probe can create this ideal environment.
A positive pressure HEPA filtered cabinet that allows the TEE ultrasound probe to be hung vertically and be stored in a dry environment, as recommended by TJC (The Joint Commission), ultrasound probe manufacturers and CS Medical.
Step #9 - Probe Storage
TEE ultrasound probes should be stored in a dry environment, hung vertically and within a HEPA clean environment. The CleanShield® TEE Ultrasound Probe Storage Cabinet is one option available to healthcare professionals as it allows compliance with current TJC (The Joint Commission) standards for care.
Step #10 - Probe Transport
Transportation of the high-level disinfected TEE ultrasound probe is a critical step in the total reprocessing cycle. Each TEE probe must be transported from the patient procedure room to a designated area for reprocessing. The method of transport should take into account the ability to deliver the probe to the procedure room without re-introducing contaminates, without dropping or hitting the transducer on any surface that could result in damage and to ensure proper probe operation.
TPorter, TEE Ultrasound Probe Transportation and Procedure Case are the healthcare professional's safe choice for TEE ultrasound probe transport to the procedure room. TPorter creates a standard of care that increases staff compliance with recommended practices for reprocessing TEE ultrasound probes while providing a secure method for transportation of both clean and soiled TEE ultrasound probes.
Conclusion
In conclusion, a standardized, evidence-based guidelines approach to the reprocessing of TEE ultrasound probes improves quality, reduces variations, and controls cost in a variety of areas, from patient care to supply chain to overall departmental revenue management. Standardization increases staff awareness, thus reducing the potential for improperly reprocessed reusable medical devices-which was one of the top 5 challenges observed by TJC and as reported in Joint Commission Online published August 31, 2016. To standardize will allow increased compliance to IC.02.02.01 and help reduce the risk of infections associated with medical equipment, devices, and supplies. As stated in QuickSafety “Breaches in equipment sterilization and high-level disinfection processes can result in outbreaks of HIV, and hepatitis B and C, as well as the transmission of bacterial infecting agents, such as Pseudomonas aeruginosa, E.coli, MRSA (methicillin resistant Staphylococcus aureaus), salmonella, and Clostridium sordellii." *3
References
Electronically accessed: http://www.cdc.gov
Electronically accessed: https://www.intersocietal.org/echo/standards/IACAdultEchocardiographyStandards2016.pdf
QuickSafety Issue 2 "Improperly sterilized or high-level disinfected equipment" May 2014